Showing posts with label My Small World Quilt. Show all posts

Friday, January 1, 2016

My Small World Quilt

Let's begin the new year on the front foot, with a post about a finish. 


From the moment I set eyes on Jen Kingwell's My Small World quilt in the Spring 2015 edition of Quiltmania I was smitten.  


A still, small (and frankly rather boring) inner voice cautioned that I had no time to cut out and sew together the thousands of tiny pieces needed to create this amazing combination of shapes and patterns. 

Besides, I'd go crazy coping with the piles of tiny scraps all over my floor, sorted into the colour palette I needed to "paint" this imaginary world. 

Not to mention my domestic machine quilting skills which I seriously doubted could do justice to such a quilt.

All of which was true.


However, once I realised My Small World would make the perfect quilt for a very special little person due to arrive in November, there was no stopping me. 

I mined my scrap box like a maniac, digging for the brightest, happiest pieces I could find. 

I fussy cut like a fiend so I could make my version into an "I Spy" quilt.

And I single-mindedly stitched together My Small World quilt top over six or seven weeks. Those fabric piles did drive me crazy, but they gave me the impetus I needed to get this stage finished.

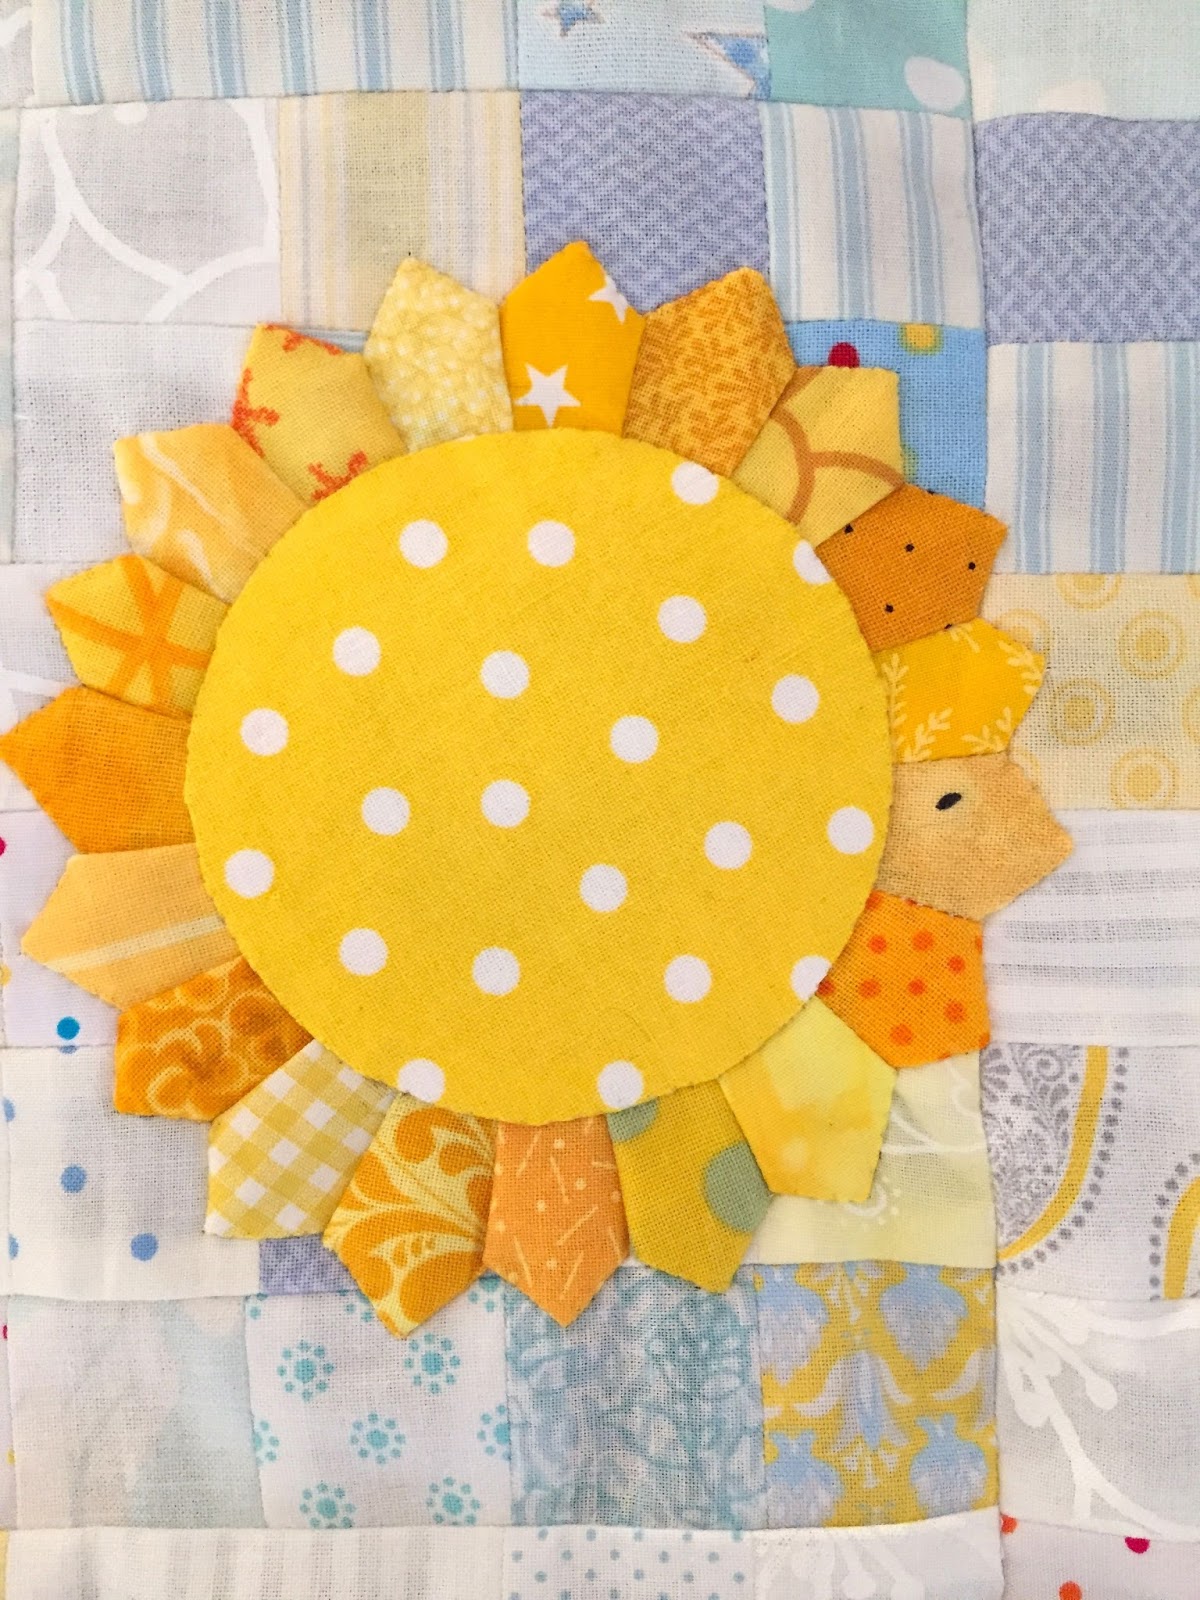
It's a pattern that lends itself - almost invites itself - to personalising. So I created a sunny yellow, blue and white colour-washed sky and, instead of the stitcheries in the original design, I filled my sky (created with around 700 x 1 inch squares) with a fairytale castle, busy bees, bubbles and a big Dresden style sun.

All over the quilt I've included little objects that are fun to discover - a car, The Cat in the Hat, a zebra, a daisy, little children, a sailing boat...and so on.


While I thought about how I was going to approach the quilting of the buildings I worked an orange peel grid over the sky. 


Then I decided to mentally break up the quilt into individual spaces and quilt each one separately. This approach meant that I could effectively avoid having to tackle machining over any any thick joins, but also gave the quilt a rich and varied texture matching the style of the original design. 


My quilting was far from perfect, but again I feel it matches the quilt's naive style. That's my story, anyway, and I'm sticking to it!


This stage of the quilting took the longest, but I found it the most creatively rewarding.


I used Aurifil thread 50wt for both my piecing and quilting, and my batting was Soft and Bright from The Warm Company.


It was easy to add a multi-coloured binding using the method described here because the binding was applied in four separate strips and I could position the colour transitions exactly where I wanted them.


With this method the stitched mitred corners (almost) always turn out like this, which I love.


An "I Spy" quilt needs a label on the back with a list of objects to find. 

Perhaps you can play the game yourself?


And finally this label, so that Princess 2 will always remember her grandma who took the time (around 4 months working 2 or 3 hours most days or evenings) to make her this gift of love.

And remained sane*


Please see these posts of mine if you're interested in more details, and tips, about the making of My Small World quilt.


* Some may disagree :-)

Friday, November 13, 2015

The BIG Reveal!

My version of Jen Kingwell's My Small World quilt is finished, quilted, bound and gifted. Yay!


But (for a change) this post isn't about the quilt. It's all about the recipient, my brand new granddaughter!


Sarah and I couldn't wait to give her some welcoming cuddles.


Cute as a button, and every bit as beautiful as her cousin, The Princess, she is definitely another little Princess! So, in future, on my blog, these precious little people will be known as Princess 1(formerly The Princess), Mr J (now a proud Big Brother) and Princess 2 (his baby sister).


The safe arrival of a baby is always a reason for rejoicing, but this little one's birth upsized that joy for our family. Two years ago I wrote this blog post. It was the second hardest I've ever written, after the hardest one a year before. 

Watching and waiting while this little one was being formed inside her mummy was like holding my breath. After all, Harry's gestation had gone smoothly too, giving no hint of the tragedy that was to come. I didn't dare share with more than a few close friends the news that another bub was on the way. Finally, with her safe arrival, I felt I could at last exhale with relief and share our happiness with the world.

Harry will always be part of our family, even if he isn't here to hug, and my heart is bursting with thankfulness to God for our new little baby girl.


Wednesday, November 11, 2015

Tips for My Small World Quilt (Part 3 - The Rainbow, Orange Peels and Clamshells)

If you're like me, you probably finished Section 3 of your My Small World Quilt and, bedazzled by the sweet rainbowy goodness of section 5, leapfrogged over the space on your design wall where Section 4 should go, to work on this colourful little corner of the world in the top left hand corner. 


It's certainly my favourite "neighbourhood" in My Small World.  

I've previously explained how I worked the Half Dresden, the Hexie Hillock and the New York Beauty Arc, but I've left you waiting far too long before explaining briefly how I approached the rainbow.

1. The Rainbow
Once again, Floriani Stitch and Wash Fusible came to the fore. Using the templates for the arcs provided in Jen Kingwell's pattern, I cut out the skinny, curved pieces and ironed each one onto a different fabric. 


Next I cut these into semi-circular shapes, folded back my seam allowances and used my Sewline glue pen to finger press these in place, ready for appliqué. This is how the pieces looked from the back.


And this is how they looked from the front.


I took the second largest semi circle (the large spot in my picture), placed it on top of the largest semi circle (the rainbow stripe), and pinned it in place with my tiny appliqué pins.


After appliquéing it to the stripe, I turned my work over and carefully cut away the striped fabric from behind the spotted one. I repeated this with each subsequent arc of the rainbow, in each case trimming away the excess fabric from behind the appliqué


Finally, this was how the finished rainbow looked from the front.


And here's the back view, showing those strips of Floriani Stitch and Wash Fusible stabilising the arcs.


2. The Orange Peel Blocks

Again, I just traced the petal shapes from the templates in the pattern, and ironed the petal shapes onto the wrong side of the different coloured scraps I was using. Then I cut out the shapes, leaving an approximate 1/4 inch all around. I folded that seam allowance back onto the Floriani and, using my glue pen, I glued them down read to hand appliqué. Very simple.


3. The Clamshells 


Yes, *again* I used the Floriani method, but I only folded back the fabric on those main curved edges, not the clamshell "stems". The trick to success with this block of My Small World is to first appliqué the bottom line of clamshells to the background fabric. Again, there's no need to do anything to those stems.

Once this row is firmly stitched in place it's easy to just stagger the positions of the clamshells in the top row so that they alternate with the bottom ones and cover the stems completely.

Of course there are other methods, but this is what works for me. 

I hope you're sharing your progress pics on Instagram :-)

Monday, August 24, 2015

Tips for My Small World Quilt {Part 2 - The Half Dresden, Hexie Hillock and New York Beauty Arc}

Ah, Part 5, the favourite section of My Small World quilt, how do I love you? 

Let me count the ways...

I love you for your Rainbow, half Dresden, New York Beauty arc and hexie hillock <3


And they are so simple when you know a few secrets!

Remember, I'm no expert. These are just a few techniques that have worked for me. I've learnt from other quilters over the years and just enjoy passing on their advice!

1. Half Dresden 

 This method gives a nice folded under edge to your Dresden blades, all ready for stress-free hand appliqué. 


First I made my own plastic template for the blades by tracing off the printed template (BC), but extending the sides upward and squaring off the top edge so it was no longer pointed, but wedge shaped.

I added a 1/4 inch seam allowance all round when I cut out my piece of fabric for my blade.

Then I folded my blade in half, and machined across the top with a 1/4 inch seam.

Using a reasonably pointy tool, I turned the blade right side out and pressed with the seam lined up down the centre. I used an oven thermometer for this because it wasn't so sharp that I might accidentally push a hole in my fabric, but a crochet hook would work well.

Once I had the required number of blades I machined them together, again with 1/4 inch seams,  machining from the bottom up to the top of each one, machining beyond the end, then reversing and stitching a short way back so that I finished up about half an inch down from the top edge of my seam. 

This meant I could snip off my threads well away from the edge of my Dresden arc, giving it a nice neat finish. 


I appliquéd my semi-circle of "garden" to the half-Dresden arc using Floriani Stitch and Wash Fusible Water Soluble Tearaway Stabiliser

Originally developed for machine embroidery, appliqué lovers have taken to it for appliqué because you simply iron your shape to the wrong side of your fabric, and lightly glue under the edges with a Sewline glue pen (or similar). Voila! It's ready to appliqué, and you never have to remove the Floriani because it just dissolves with washing. Not that you need hurry to do that because it doesn't feel unpleasant in your finished quilt.
Floriani make several similar-sounding stabilisers, so take care to remember the right one.

I used basically the same Dresden technique to make my little appliqué sun, but my tiny blade template was from the Westwood Acres Mini Dresden pattern and I used a lid to cut my circle.


2. The Hexie Hillock*

There are plenty of ways to obtain the papers for English Paper Piecing these tiny hexagons. 
The easiest way is to design your own 1/2 inch hexagons using a site such as Incomptech, then download and print them onto light card.

To my mind the challenge of this little element of My Small World lies in trimming back the hand stitched hexes from this shape...


... to this ...


... without snipping those threads and potentially unravelling your hand stitching - Yikes!

Once again I turned to my roll of Floriani Stitch and Wash Fusible Water Soluble Tearaway Stabiliser, traced off the semi-circle shape from the printed template and fused (ironed) it to the back of my hexagon work.

Then I used a short stitch to machine around the Floriani, keeping close to the edge.


With the unravelling thus prevented, I could safely cut through the hand stitching as I trimmed the hexes back, leaving approximately 1/4 inch.


Then I folded this over, taking care to bring the line of machine stitching to the back where it was hidden and could not be seen on the edge, and my hexie hillock was now ready to appliqué!


*Well, it looks like a little hill to me :-)

3. The New York Beauty Arc

I thought I'd end this post with a block that looks complicated, but is very easily made using foundation paper piecing. 

If creating from scratch is important to you, you can spend a very long time creating your own foundation papers from the pattern diagrams in Quiltmania. 

Or you can English Paper Piece all those tiny, spiky slivers. On her latest blog post clever Danielle of Mes Petits Elephants has some fabulous instructions on how to do this.

Or you can do what I did, and pop over here to Sarah's blog where she has a simpler solution!


Phew, I think that's probably quite enough information for one post! 

So next time, in my final post of Tips for My Small World Quilt, I'll cover construction of the rainbow, clam shells, orange peel blocks and pinwheels.


Friday, August 21, 2015

Tips for My Small World Quilt {Part 1 - Fabrics, foundations, and all that sky}


Here it is, my version of Jen Kingwell's My Small World Quilt, finally finished, except for the quilting, after six weeks of rummaging through scraps, mess, fussy cutting, mess, picking threads off every outfit I've worn, ... and did I mention the mess?

My finished My Small World Quilt
From the moment I first set eyes on this quilt in the Spring 2015 edition of Quiltmania I knew it was bad news (but in the nicest possible way!).

Jen Kingwell's My Small World Quilt in the Spring 2015 edition of Quiltmania 
Like the Lorelei, this fabulous quilt, with its thousands of tiny pieces, called to me right from the start, but I knew I had no room in my life for a new project. 

With quilters the world over scrambling to secure their copy of Quiltmania, I couldn't believe my luck when I found a copy in my local newsagent (but then I am the only quilter in the village!) and I had to have it. I quietly congratulated myself on the wisdom of my purchase, "just in case I might want to make it at some time in the distant future," I told myself.

Then this happened.

I blame all the quilters posting dazzling photos of their quilts on Instagram. Inspiration overload! In a weak moment I succumbed, and in no time at all I had completed Part 1.


... and Part 2!


Virtual champagne glass in hand, I joined the worldwide My Small World Quiltalong party on Instagram (#mysmallworldqal) steered by  

and ably supported by  
and

Each of these experienced quilt makers has offered really useful information on their blog about how to complete the various sections of this quilt, and most importantly the errata, and if you're reading this in preparation for attempting wonderful quilt you should read what they've written. 

I've found it immensely helpful.

At the risk of possibly repeating some of their advice, I thought I'd also share with you some of the lessons I've personally learnt along the way. 

1. It's not as simple as it "seams"
This is not a quilt for beginners. The pattern has very few instructions beyond the printed templates and there is a huge amount of assumed knowledge.

A short stitch length, and pressing your seams open, instead of to one side, is helpful. 
An accurate scant 1/4 inch seam is essential, with so many seams involved. I used my Westalee Scant 1/4" Seam Gauge to try to ensure I had a consistent seam measurement each time I turned on my machine. With so many seams the opportunity for distorting the dimensions is hugely increased.

Press seams open.
2. The importance of a good foundation
One of our early arrivals at the party was foundation piecing whizz, Sarah of Sew What Sherlock, who realised pretty quickly that many of the blocks could be created much more easily using foundation paper piecing rather than piecing fabric shapes cut from the templates printed in Quiltmania.
If you contact Sarah through the link above, ask very nicely and supply her with a "ransom photo" (you'll understand when you read her blog) she'll email you a PDF of foundation paper patterns which will make your job considerably less stressful.

3. Choosing fabrics
Don't over-think these, it is a scrap quilt after all. 
Search Instagram (#mysmallworldqal) and you'll be surprised at all the different colour schemes. Fabulous inspiration!
I made my quilt entirely from my scrap bin, and for once I was glad to be a hoarder. 

Since my quilt is for a little person I decided to include lots of "I spy" elements for little eyes to search out. These include the school bus, sailing boat, clown, puppy, bees, daisies, stars and little boy that you can see in this photo.


The important thing to remember when selecting fabrics is balance.

It doesn't have to be all matchy-matchy, but if you use a scrap of fabric on the right hand side of your quilt it will look balanced if you also use a tiny piece in one or two other areas. I think, in the end, I had a palette of around 40 to 50 fabrics of all different sizes, and I kept to these, with a few exceptions, trying to evenly distribute them across the quilt.

Your quilt will also look better if you generally keep a balance of dark, medium and light hues throughout the pattern. I've found the best way to keep track of this is to periodically take a monochrome photo of my quilt, so I just see the hues and I'm not distracted by the colours.


 And don't think that, just because you're making a 33" x 52" quilt using (much) more than a thousand pieces of fabric, you're going to make more than the slightest dent in the level of your scrap bin. 

It doesn't work that way. 
Don't ask me why. 
It's just the Law of Scraps!

4.The sky's the limit!

Here's Jen Kingwell's original My Small World Quilt, photographed from the back cover of Quiltmania. She's used a low volume palette of beiges and creams, but you don't have to stay with this colour scheme.

Use your imagination! You're going to spend a great deal of time piecing that sky together so you might as well make it interesting. 
On Instagram I've seen dark night skies, blue skies, bright sunshiny yellow skies and more. 

I chose to create a sky with graduated shades of blue, yellow and white. Each of those squares finishes at 1 inch so you can really have fun "painting" your sky with your fabrics.


I  didn't embroider the Sydney Opera House and Harbour Bridge, Leaning Tower of Pisa and Eiffel Tower patterns designed by Jen to 'float' in the sky, delightful as they are. Here's an opportunity to add your individual touches. I've seen appliquéd birds and hot air balloons, as well as embroidered scenes from a quilter's own travels.

Since I already had these fairytale castle towers in my stash I pieced them into my sky, along with some fat little bumble bees, and finally added a big golden sun with Dresden rays. 


I hope this has given you lots of ideas to get those creative juices flowing!
Next time I'll show you how I worked the Dresden appliqué, as well as some of the other elements of My Small World.