Monday, August 24, 2015

Tips for My Small World Quilt {Part 2 - The Half Dresden, Hexie Hillock and New York Beauty Arc}

Ah, Part 5, the favourite section of My Small World quilt, how do I love you? 

Let me count the ways...

I love you for your Rainbow, half Dresden, New York Beauty arc and hexie hillock <3


And they are so simple when you know a few secrets!

Remember, I'm no expert. These are just a few techniques that have worked for me. I've learnt from other quilters over the years and just enjoy passing on their advice!

1. Half Dresden 

 This method gives a nice folded under edge to your Dresden blades, all ready for stress-free hand appliqué. 


First I made my own plastic template for the blades by tracing off the printed template (BC), but extending the sides upward and squaring off the top edge so it was no longer pointed, but wedge shaped.

I added a 1/4 inch seam allowance all round when I cut out my piece of fabric for my blade.

Then I folded my blade in half, and machined across the top with a 1/4 inch seam.

Using a reasonably pointy tool, I turned the blade right side out and pressed with the seam lined up down the centre. I used an oven thermometer for this because it wasn't so sharp that I might accidentally push a hole in my fabric, but a crochet hook would work well.

Once I had the required number of blades I machined them together, again with 1/4 inch seams,  machining from the bottom up to the top of each one, machining beyond the end, then reversing and stitching a short way back so that I finished up about half an inch down from the top edge of my seam. 

This meant I could snip off my threads well away from the edge of my Dresden arc, giving it a nice neat finish. 


I appliquéd my semi-circle of "garden" to the half-Dresden arc using Floriani Stitch and Wash Fusible Water Soluble Tearaway Stabiliser

Originally developed for machine embroidery, appliqué lovers have taken to it for appliqué because you simply iron your shape to the wrong side of your fabric, and lightly glue under the edges with a Sewline glue pen (or similar). Voila! It's ready to appliqué, and you never have to remove the Floriani because it just dissolves with washing. Not that you need hurry to do that because it doesn't feel unpleasant in your finished quilt.
Floriani make several similar-sounding stabilisers, so take care to remember the right one.

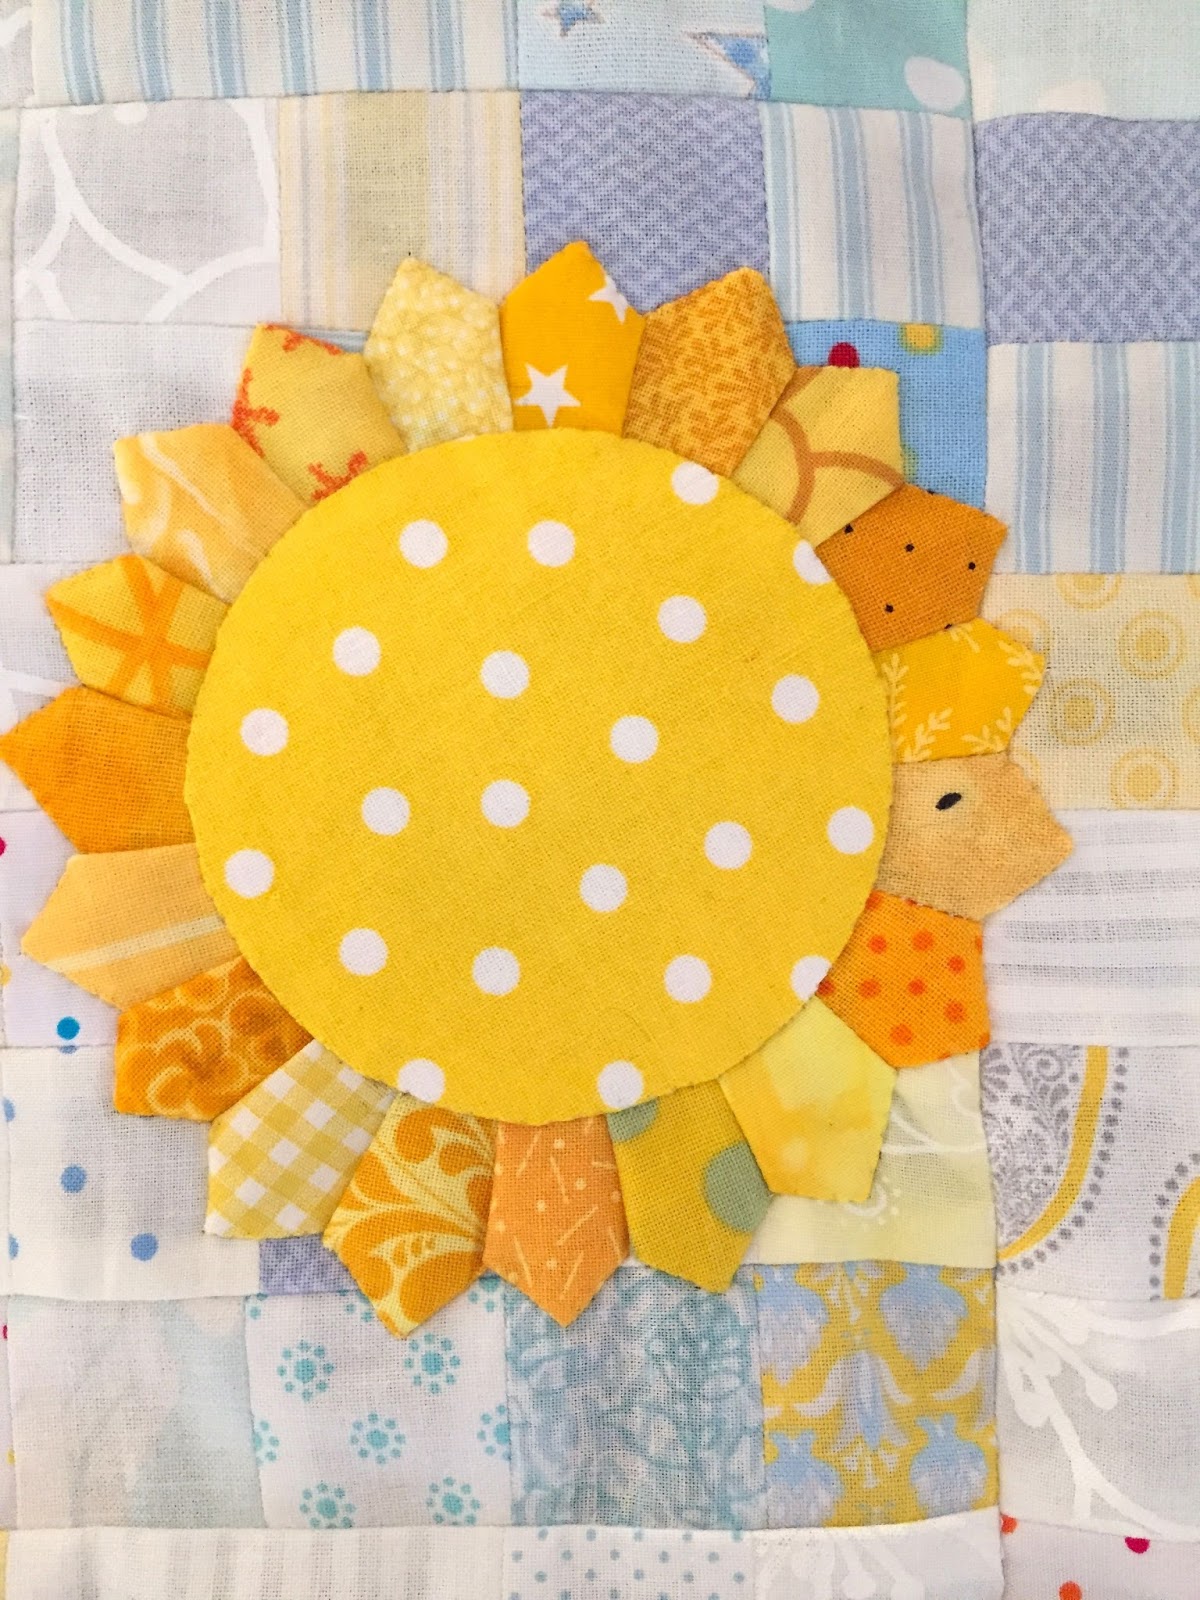
I used basically the same Dresden technique to make my little appliqué sun, but my tiny blade template was from the Westwood Acres Mini Dresden pattern and I used a lid to cut my circle.


2. The Hexie Hillock*

There are plenty of ways to obtain the papers for English Paper Piecing these tiny hexagons. 
The easiest way is to design your own 1/2 inch hexagons using a site such as Incomptech, then download and print them onto light card.

To my mind the challenge of this little element of My Small World lies in trimming back the hand stitched hexes from this shape...


... to this ...


... without snipping those threads and potentially unravelling your hand stitching - Yikes!

Once again I turned to my roll of Floriani Stitch and Wash Fusible Water Soluble Tearaway Stabiliser, traced off the semi-circle shape from the printed template and fused (ironed) it to the back of my hexagon work.

Then I used a short stitch to machine around the Floriani, keeping close to the edge.


With the unravelling thus prevented, I could safely cut through the hand stitching as I trimmed the hexes back, leaving approximately 1/4 inch.


Then I folded this over, taking care to bring the line of machine stitching to the back where it was hidden and could not be seen on the edge, and my hexie hillock was now ready to appliqué!


*Well, it looks like a little hill to me :-)

3. The New York Beauty Arc

I thought I'd end this post with a block that looks complicated, but is very easily made using foundation paper piecing. 

If creating from scratch is important to you, you can spend a very long time creating your own foundation papers from the pattern diagrams in Quiltmania. 

Or you can English Paper Piece all those tiny, spiky slivers. On her latest blog post clever Danielle of Mes Petits Elephants has some fabulous instructions on how to do this.

Or you can do what I did, and pop over here to Sarah's blog where she has a simpler solution!


Phew, I think that's probably quite enough information for one post! 

So next time, in my final post of Tips for My Small World Quilt, I'll cover construction of the rainbow, clam shells, orange peel blocks and pinwheels.


Friday, August 21, 2015

Tips for My Small World Quilt {Part 1 - Fabrics, foundations, and all that sky}


Here it is, my version of Jen Kingwell's My Small World Quilt, finally finished, except for the quilting, after six weeks of rummaging through scraps, mess, fussy cutting, mess, picking threads off every outfit I've worn, ... and did I mention the mess?

My finished My Small World Quilt
From the moment I first set eyes on this quilt in the Spring 2015 edition of Quiltmania I knew it was bad news (but in the nicest possible way!).

Jen Kingwell's My Small World Quilt in the Spring 2015 edition of Quiltmania 
Like the Lorelei, this fabulous quilt, with its thousands of tiny pieces, called to me right from the start, but I knew I had no room in my life for a new project. 

With quilters the world over scrambling to secure their copy of Quiltmania, I couldn't believe my luck when I found a copy in my local newsagent (but then I am the only quilter in the village!) and I had to have it. I quietly congratulated myself on the wisdom of my purchase, "just in case I might want to make it at some time in the distant future," I told myself.

Then this happened.

I blame all the quilters posting dazzling photos of their quilts on Instagram. Inspiration overload! In a weak moment I succumbed, and in no time at all I had completed Part 1.


... and Part 2!


Virtual champagne glass in hand, I joined the worldwide My Small World Quiltalong party on Instagram (#mysmallworldqal) steered by  

and ably supported by  
and

Each of these experienced quilt makers has offered really useful information on their blog about how to complete the various sections of this quilt, and most importantly the errata, and if you're reading this in preparation for attempting wonderful quilt you should read what they've written. 

I've found it immensely helpful.

At the risk of possibly repeating some of their advice, I thought I'd also share with you some of the lessons I've personally learnt along the way. 

1. It's not as simple as it "seams"
This is not a quilt for beginners. The pattern has very few instructions beyond the printed templates and there is a huge amount of assumed knowledge.

A short stitch length, and pressing your seams open, instead of to one side, is helpful. 
An accurate scant 1/4 inch seam is essential, with so many seams involved. I used my Westalee Scant 1/4" Seam Gauge to try to ensure I had a consistent seam measurement each time I turned on my machine. With so many seams the opportunity for distorting the dimensions is hugely increased.

Press seams open.
2. The importance of a good foundation
One of our early arrivals at the party was foundation piecing whizz, Sarah of Sew What Sherlock, who realised pretty quickly that many of the blocks could be created much more easily using foundation paper piecing rather than piecing fabric shapes cut from the templates printed in Quiltmania.
If you contact Sarah through the link above, ask very nicely and supply her with a "ransom photo" (you'll understand when you read her blog) she'll email you a PDF of foundation paper patterns which will make your job considerably less stressful.

3. Choosing fabrics
Don't over-think these, it is a scrap quilt after all. 
Search Instagram (#mysmallworldqal) and you'll be surprised at all the different colour schemes. Fabulous inspiration!
I made my quilt entirely from my scrap bin, and for once I was glad to be a hoarder. 

Since my quilt is for a little person I decided to include lots of "I spy" elements for little eyes to search out. These include the school bus, sailing boat, clown, puppy, bees, daisies, stars and little boy that you can see in this photo.


The important thing to remember when selecting fabrics is balance.

It doesn't have to be all matchy-matchy, but if you use a scrap of fabric on the right hand side of your quilt it will look balanced if you also use a tiny piece in one or two other areas. I think, in the end, I had a palette of around 40 to 50 fabrics of all different sizes, and I kept to these, with a few exceptions, trying to evenly distribute them across the quilt.

Your quilt will also look better if you generally keep a balance of dark, medium and light hues throughout the pattern. I've found the best way to keep track of this is to periodically take a monochrome photo of my quilt, so I just see the hues and I'm not distracted by the colours.


 And don't think that, just because you're making a 33" x 52" quilt using (much) more than a thousand pieces of fabric, you're going to make more than the slightest dent in the level of your scrap bin. 

It doesn't work that way. 
Don't ask me why. 
It's just the Law of Scraps!

4.The sky's the limit!

Here's Jen Kingwell's original My Small World Quilt, photographed from the back cover of Quiltmania. She's used a low volume palette of beiges and creams, but you don't have to stay with this colour scheme.

Use your imagination! You're going to spend a great deal of time piecing that sky together so you might as well make it interesting. 
On Instagram I've seen dark night skies, blue skies, bright sunshiny yellow skies and more. 

I chose to create a sky with graduated shades of blue, yellow and white. Each of those squares finishes at 1 inch so you can really have fun "painting" your sky with your fabrics.


I  didn't embroider the Sydney Opera House and Harbour Bridge, Leaning Tower of Pisa and Eiffel Tower patterns designed by Jen to 'float' in the sky, delightful as they are. Here's an opportunity to add your individual touches. I've seen appliquéd birds and hot air balloons, as well as embroidered scenes from a quilter's own travels.

Since I already had these fairytale castle towers in my stash I pieced them into my sky, along with some fat little bumble bees, and finally added a big golden sun with Dresden rays. 


I hope this has given you lots of ideas to get those creative juices flowing!
Next time I'll show you how I worked the Dresden appliqué, as well as some of the other elements of My Small World.

Sunday, August 9, 2015

Plenty

Whenever St Mark's Quilters come together for a workshop you can always count on plenty of laughter, tasty treats and beautiful quilts for RPA Hospital's Newborn Intensive Care Unit and the KU Marcia Burgess Autism Specific Early Learning and Care Centre at Liverpool.


Yesterday Margaret spent her time stitching down the binding on her latest hexie quilt. She's been carefully piecing it together by the fire throughout the winter months in Sydney, and now it's almost finished and ready for its long journey across the world to Holland where it will wrap her ninth great grand baby (due in just a couple of weeks) with her love.


Clever Susie's been flying high making this fun kindy quilt from a panel. Super fast, and so easy to quilt around those planes and clouds.


This sweet little Blanket of Love, however, would have required rather more planning and concentration. Susie used the Li'l Twister tool to achieve this beautiful result.


We love to see our quilters stretch themselves and try out a new technique or skill, so we were super excited when Susie attached her machine's quilting foot, donned her rubber quilting gloves and spent a couple of hours becoming more and more comfortable free motion quilting a practice piece. Woohoo!

I can't wait to see how she quilts this latest little Blanket of Love. 


The "S Team" (Sophie and Susan) have been busy collaborating on this cheerful kindy quilt.


They added this quirky row of rabbits to enlarge the strippy flower garden quilt they started a couple of months ago.


And they added a checkered border to this cute panel. Love the blue sneakers too!


Perdita, one of our pastel loving quilters, added these Blankets of Love, one in pink and green with a kiss of lemon, and the other in crisp blue and white.


Then she wasted no time in planning and cutting her next one, in her signature colour of pink of course.


Gail also leans towards pastels, and here's her latest finish.


One of the things about getting together is that we can always get help with layouts and colour choices. Sometimes it's hard to make a decision alone, and it helps to stand back and get another opinion, something both Gail and Michelle found helpful yesterday as they were laying out their fabrics.

This one is Gail's...


...and this is Michelle's. These are going to become snowball blocks, and Michelle's chosen her colours to co-ordinate with that cute bird feature fabric.


Gillian was as quiet as the colours in her soft pink quilt as she sat patiently hand appliquéing all these scrappy hearts. She always approaches her quilting imaginatively so I can't wait to see how she quilts this one.


For this one Barb was inspired by a huge Hunter's Star quilt she saw recently on a friend's bed.


You'll have to wait till next time to see this quilt Barb spent her time binding yesterday. Love the cute Winnie the Pooh backing!


If I had to pick a signature colour for Di C it would be yellow, in all its variations from old gold through to lemon. When we were given some pieces of mellow country-themed fabrics a couple of months ago Di knew that yellow was exactly what was needed to make these fabrics shine. 


A little person is going to just love looking at those sheep, pigs, horses and ducks. What a warm, golden glow this lovely quilt has! 


Here's another of Di C's yellow quilts, a sunny Blanket of Love.


And keeping right on with the sunny theme, here's her latest quilt in progress, featuring yellow ducklings. 

There's something special and warming about yellow, and these days I find I can rarely stop myself including yellow somewhere in the design.


Here's another stunner, this time from Di B.  She's used the Quick Curve Ruler to cut these fabrics, and her colour combination is spot-on!


Martians on the front and back, and a rainbow binding make this kindy quilt a sure winner.


Di B also brought along two smaller masterpieces, this from Jaybird Quilts' Candy Dish pattern, using the rich orange colour way fabrics from Emma Jean Jansen's Terra Australis range...


...and this Emma Jean Jansen Flower Power pattern using fabrics from Emma Jean's The Linen Cupboard range. Just look at that quilting. Mmmmm... feathers!


After such an amazing effort it wasn't surprising that Di spent a relatively relaxed day binding her latest Blanket of Love.


The next, and final, three are my contributions. I finished this one a little while ago, but loved it so much that I've only now felt ready to add it to our St Mark's Quilters' collection. Do you ever feel like that about a quilt? 

I used my Quick Curve Ruler to cut the pieces, and the Quick Curve Sidekick Ruler to guide my free motion quilting on my domestic machine.


I started this Economy Block quilt last year, and somehow it languished without a binding until recently. I like the bright colours and fussy cut framed squares and I hope they appeal to a little person.


These are the beginnings of my next Blanket of Love. More to come next month.


So, a dozen women spent the day cutting up fabric and sewing it back together again.

Are we nuts?


Not when I see photos like these, sent to us by the staff of "The Marcia", showing some of our darling little quilt recipients and their families. 

The smiles on those faces make it all worthwhile. 


Besides, the world's a safer place for everyone when we quilt! ;-)